
1. Introduction
In the Background Work with WorkManager codelab, you learned how to execute work in the background (not on the main thread) using WorkManager. In this codelab, you will continue learning about WorkManager functionality for ensuring unique work, tagging work, canceling work, and work constraints. The codelab will finish with you learning how to write automated tests to verify that your workers function properly and return the expected results. You will also learn how to use the Background Task Inspector, provided by Android Studio, to inspect queued workers.
What you'll build
In this codelab, you will ensure unique work, tagging work, canceling work, and implementing work constraints. You will then learn how to write automated UI tests for the Blur-O-Matic app that verify the functionality of the three workers created in the Background Work with WorkManager codelab:
BlurWorkerCleanupWorkerSaveImageToFileWorker
What you'll learn
- Ensuring unique work.
- How to cancel work.
- How to define work constraints.
- How to write automated tests to verify Worker functionality.
- The basics of inspecting queued workers with the Background Task Inspector.
What you'll need
- The latest stable version of Android Studio
- Completion of the Background Work with WorkManager codelab
- An Android device or emulator
2. Getting set up
Download the Code
Click the following link to download all the code for this codelab:
Or if you prefer, you can clone the code from GitHub:
$ git clone https://github.com/google-developer-training/basic-android-kotlin-compose-training-workmanager.git
$ cd basic-android-kotlin-compose-training-workmanager
$ git checkout intermediate
Open the project in Android Studio.
3. Ensure unique work
Now that you know how to chain workers, it's time to tackle another powerful feature of WorkManager: unique work sequences.
Sometimes, you only want one chain of work to run at a time. For example, perhaps you have a work chain that syncs your local data with the server. You probably want the first data sync to complete before starting a new one. To do this, you use beginUniqueWork() instead of beginWith(), and you provide a unique String name. This input names the entire chain of work requests so that you can refer to and query them together.
You also need to pass in an ExistingWorkPolicy object. This object tells the Android OS what happens if the work already exists. Possible ExistingWorkPolicy values are REPLACE, KEEP, APPEND, or APPEND_OR_REPLACE.
In this app, you want to use REPLACE because if a user decides to blur another image before the current one finishes, you want to stop the current one and start blurring the new image.
You also want to ensure that if a user clicks Start when a work request is already enqueued, then the app replaces the previous work request with the new request. It does not make sense to continue working on the previous request because the app replaces it with the new request anyway.
In the data/WorkManagerBluromaticRepository.kt file, inside the applyBlur() method, complete the following steps:
- Remove the call to
beginWith()function and add a call to thebeginUniqueWork()function. - For the first parameter to the
beginUniqueWork()function, pass in the constantIMAGE_MANIPULATION_WORK_NAME. - For the second parameter, the
existingWorkPolicyparameter, pass inExistingWorkPolicy.REPLACE. - For the third parameter, create a new
OneTimeWorkRequestfor theCleanupWorker.
data/WorkManagerBluromaticRepository.kt
import androidx.work.ExistingWorkPolicy
import com.example.bluromatic.IMAGE_MANIPULATION_WORK_NAME
...
// REPLACE THIS CODE:
// var continuation = workManager.beginWith(OneTimeWorkRequest.from(CleanupWorker::class.java))
// WITH
var continuation = workManager
    .beginUniqueWork(
        IMAGE_MANIPULATION_WORK_NAME,
        ExistingWorkPolicy.REPLACE,
        OneTimeWorkRequest.from(CleanupWorker::class.java)
    )
...
Blur-O-Matic now only blurs one image at a time.
4. Tag and update the UI based on Work status
The next change you make is to what the app shows when the Work executes. Information returned about the enqueued works determines how the UI needs to change.
This table shows three different methods that you can call to get work information:
Type | WorkManager Method | Description |
Get work using id | This function returns a single LiveData<WorkInfo> for a specific WorkRequest by its ID. | |
Get work using unique chain name | This function returns LiveData<List<WorkInfo>> for all work in a unique chain of WorkRequests. | |
Get work using a tag | This function returns the LiveData<List<WorkInfo>> for a tag. |
A WorkInfo object contains details about the current state of a WorkRequest, including:
- Whether the work is
BLOCKED,CANCELLED,ENQUEUED,FAILED,RUNNING, orSUCCEEDED. - If the
WorkRequestis finished and any output data from the work.
These methods return LiveData. LiveData is a lifecycle aware observable data holder. We convert it into a Flow of WorkInfo objects by calling .asFlow().
Because you are interested in when the final image saves, you add a tag to the SaveImageToFileWorker WorkRequest so that you can get its WorkInfo from the getWorkInfosByTagLiveData() method.
Another option is to use the getWorkInfosForUniqueWorkLiveData() method, which returns information about all three WorkRequests (CleanupWorker, BlurWorker, and SaveImageToFileWorker). The downside to this method is that you need additional code to specifically find the necessary SaveImageToFileWorker information.
Tag the work request
Tagging the work is done in the data/WorkManagerBluromaticRepository.kt file inside the applyBlur() function.
- When you create the
SaveImageToFileWorkerwork request, tag the work by calling theaddTag()method and passing in theStringconstantTAG_OUTPUT.
data/WorkManagerBluromaticRepository.kt
import com.example.bluromatic.TAG_OUTPUT
...
val save = OneTimeWorkRequestBuilder<SaveImageToFileWorker>()
    .addTag(TAG_OUTPUT) // <- Add this
    .build()
Instead of a WorkManager ID, you use a tag to label your work because if your user blurs multiple images, all of the save image WorkRequests have the same tag but not the same ID.
Get the WorkInfo
You use the WorkInfo information from the SaveImageToFileWorker work request in the logic to decide which composables to display in the UI based on the BlurUiState.
The ViewModel consumes this information from the repository's outputWorkInfo variable.
Now that you have tagged the SaveImageToFileWorker work request, you can complete the following steps to retrieve its information:
- In the
data/WorkManagerBluromaticRepository.ktfile, call theworkManager.getWorkInfosByTagLiveData()method to populate theoutputWorkInfovariable. - Pass in the
TAG_OUTPUTconstant for the method's parameter.
data/WorkManagerBluromaticRepository.kt
...
override val outputWorkInfo: Flow<WorkInfo?> =
    workManager.getWorkInfosByTagLiveData(TAG_OUTPUT)
...
The call of the getWorkInfosByTagLiveData() method returns LiveData. LiveData is a lifecycle aware observable data holder. The .asFlow() function converts it to a Flow.
- Chain a call to the
.asFlow()function to convert the method to a Flow. You convert the method so the app can work with a Kotlin Flow instead of LiveData.
data/WorkManagerBluromaticRepository.kt
import androidx.lifecycle.asFlow
...
override val outputWorkInfo: Flow<WorkInfo?> =
    workManager.getWorkInfosByTagLiveData(TAG_OUTPUT).asFlow()
...
- Chain a call to the
.mapNotNull()transform function to ensure the Flow contains values. - For the transform rule, if the element is not empty, select the first item in the collection. Otherwise, return a null value. The transform function will then remove them if they are a null value.
data/WorkManagerBluromaticRepository.kt
import kotlinx.coroutines.flow.mapNotNull
...
    override val outputWorkInfo: Flow<WorkInfo?> =
        workManager.getWorkInfosByTagLiveData(TAG_OUTPUT).asFlow().mapNotNull {
            if (it.isNotEmpty()) it.first() else null
        }
...
- Because the
.mapNotNull()transform function guarantees that a value exists, you can safely remove the?from the Flow type as it no longer needs to be a nullable type.
data/WorkManagerBluromaticRepository.kt
...
    override val outputWorkInfo: Flow<WorkInfo> =
...
- You also need to remove the
?from theBluromaticRepositoryinterface.
data/BluromaticRepository.kt
...
interface BluromaticRepository {
//    val outputWorkInfo: Flow<WorkInfo?>
    val outputWorkInfo: Flow<WorkInfo>
...
The WorkInfo information is emitted as a Flow from the repository. The ViewModel then consumes it.
Update the BlurUiState
The ViewModel uses the WorkInfo emitted by the repository from the outputWorkInfo Flow to set the value of the blurUiState variable.
The UI code uses the blurUiState variable value to determine which composables to display.
Complete the following steps to perform the blurUiState update:
- Populate the
blurUiStatevariable with theoutputWorkInfoFlow from the repository.
ui/BlurViewModel.kt
// ...
// REMOVE
// val blurUiState: StateFlow<BlurUiState> = MutableStateFlow(BlurUiState.Default)

// ADD
val blurUiState: StateFlow<BlurUiState> = bluromaticRepository.outputWorkInfo
// ...
- You then need to map the values in the Flow to the
BlurUiStatestates, depending on the status of the work.
When the work is finished, set the blurUiState variable to BlurUiState.Complete(outputUri = "").
When the work is cancelled, set the blurUiState variable to BlurUiState.Default.
Otherwise, set the blurUiState variable to BlurUiState.Loading.
ui/BlurViewModel.kt
import androidx.work.WorkInfo
import kotlinx.coroutines.flow.map
// ...

    val blurUiState: StateFlow<BlurUiState> = bluromaticRepository.outputWorkInfo
        .map { info ->
            when {
                info.state.isFinished -> {
                    BlurUiState.Complete(outputUri = "")
                }
                info.state == WorkInfo.State.CANCELLED -> {
                    BlurUiState.Default
                }
                else -> BlurUiState.Loading
            }
        }

// ...
- Because you are interested in a StateFlow, convert the Flow by chaining a call to the
.stateIn()function.
The call to the .stateIn() function requires three arguments:
- For the first parameter, pass
viewModelScope, which is the coroutine scope tied to the ViewModel. - For the second parameter, pass
SharingStarted.WhileSubscribed(5_000). This parameter controls when sharing starts and stops. - For the third parameter, pass
BlurUiState.Default, which is the initial value of the state flow.
ui/BlurViewModel.kt
import kotlinx.coroutines.flow.stateIn
import androidx.lifecycle.viewModelScope
import kotlinx.coroutines.flow.SharingStarted
// ...

    val blurUiState: StateFlow<BlurUiState> = bluromaticRepository.outputWorkInfo
        .map { info ->
            when {
                info.state.isFinished -> {
                    BlurUiState.Complete(outputUri = "")
                }
                info.state == WorkInfo.State.CANCELLED -> {
                    BlurUiState.Default
                }
                else -> BlurUiState.Loading
            }
        }.stateIn(
            scope = viewModelScope,
            started = SharingStarted.WhileSubscribed(5_000),
            initialValue = BlurUiState.Default
        )

// ...
The ViewModel exposes the UI state information as a StateFlow through the blurUiState variable. The flow converts from a cold Flow to a hot StateFlow by calling the stateIn() function.
Update the UI
In the ui/BluromaticScreen.kt file, you get the UI state from the ViewModel's blurUiState variable and update the UI.
A when block controls the app's UI. This when block has a branch for each of the three BlurUiState states.
The UI updates in the BlurActions composable inside its Row composable. Complete the following steps:
- Remove the
Button(onStartClick)code inside theRowComposable and replace it with awhenblock withblurUiStateas its argument.
ui/BluromaticScreen.kt
...
    Row(
        modifier = modifier,
        horizontalArrangement = Arrangement.Center
    ) {
        // REMOVE
        // Button(
        //     onClick = onStartClick,
        //     modifier = Modifier.fillMaxWidth()
        // ) {
        //     Text(stringResource(R.string.start))
        // }
        // ADD
        when (blurUiState) {
        }
    }
...
When the app opens, it is at its default state. This state in code is represented as BlurUiState.Default.
- Inside the
whenblock, create a branch for this state as shown in the following code example:
ui/BluromaticScreen.kt
...
    Row(
        modifier = modifier,
        horizontalArrangement = Arrangement.Center
    ) {
        when (blurUiState) {
            is BlurUiState.Default -> {}
        }
    }
...
For the default state, the app shows the Start button.
- For the
onClickparameter in theBlurUiState.Defaultstate, pass theonStartClickvariable, which is being passed to the composable. - For the
stringResourceIdparameter, pass the string resource id ofR.string.start.
ui/BluromaticScreen.kt
...
    Row(
        modifier = modifier,
        horizontalArrangement = Arrangement.Center
    ) {
        when (blurUiState) {
            is BlurUiState.Default -> {
                Button(
                    onClick = onStartClick,
                    modifier = Modifier.fillMaxWidth()
                ) {
                    Text(stringResource(R.string.start))
                }
        }
    }
...
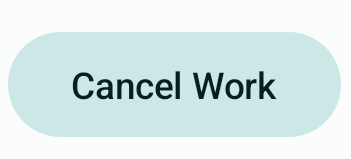
When the app is actively blurring an image, that is the BlurUiState.Loading state. For this state, the app shows the Cancel Work button and a circular progress indicator.
- For the button's
onClickparameter in theBlurUiState.Loadingstate, passonCancelClickvariable, which is being passed to the composable. - For the button's
stringResourceIdparameter, pass the string resource id ofR.string.cancel_work.
ui/BluromaticScreen.kt
import androidx.compose.material3.CircularProgressIndicator
import androidx.compose.material3.FilledTonalButton
...
    Row(
        modifier = modifier,
        horizontalArrangement = Arrangement.Center
    ) {
        when (blurUiState) {
            is BlurUiState.Default -> {
                Button(onStartClick) { Text(stringResource(R.string.start)) }
            }
            is BlurUiState.Loading -> {
               FilledTonalButton(onCancelClick) { Text(stringResource(R.string.cancel_work)) }
               CircularProgressIndicator(modifier = Modifier.padding(dimensionResource(R.dimen.padding_small)))
            }
        }
    }
...
The last state to configure is the BlurUiState.Complete state, which occurs after an image blurs and saves. At this time, the app only displays the Start button.
- For its
onClickparameter in theBlurUiState.Completestate, pass theonStartClickvariable. - For its
stringResourceIdparameter, pass the string resource id ofR.string.start.
ui/BluromaticScreen.kt
...
    Row(
        modifier = modifier,
        horizontalArrangement = Arrangement.Center
    ) {
        when (blurUiState) {
            is BlurUiState.Default -> {
                Button(onStartClick) { Text(stringResource(R.string.start)) }
            }
            is BlurUiState.Loading -> {
                FilledTonalButton(onCancelClick) { Text(stringResource(R.string.cancel_work)) }
                CircularProgressIndicator(modifier = Modifier.padding(dimensionResource(R.dimen.padding_small)))
            }
            is BlurUiState.Complete -> {
                Button(onStartClick) { Text(stringResource(R.string.start)) }
            }
        }
    }
...
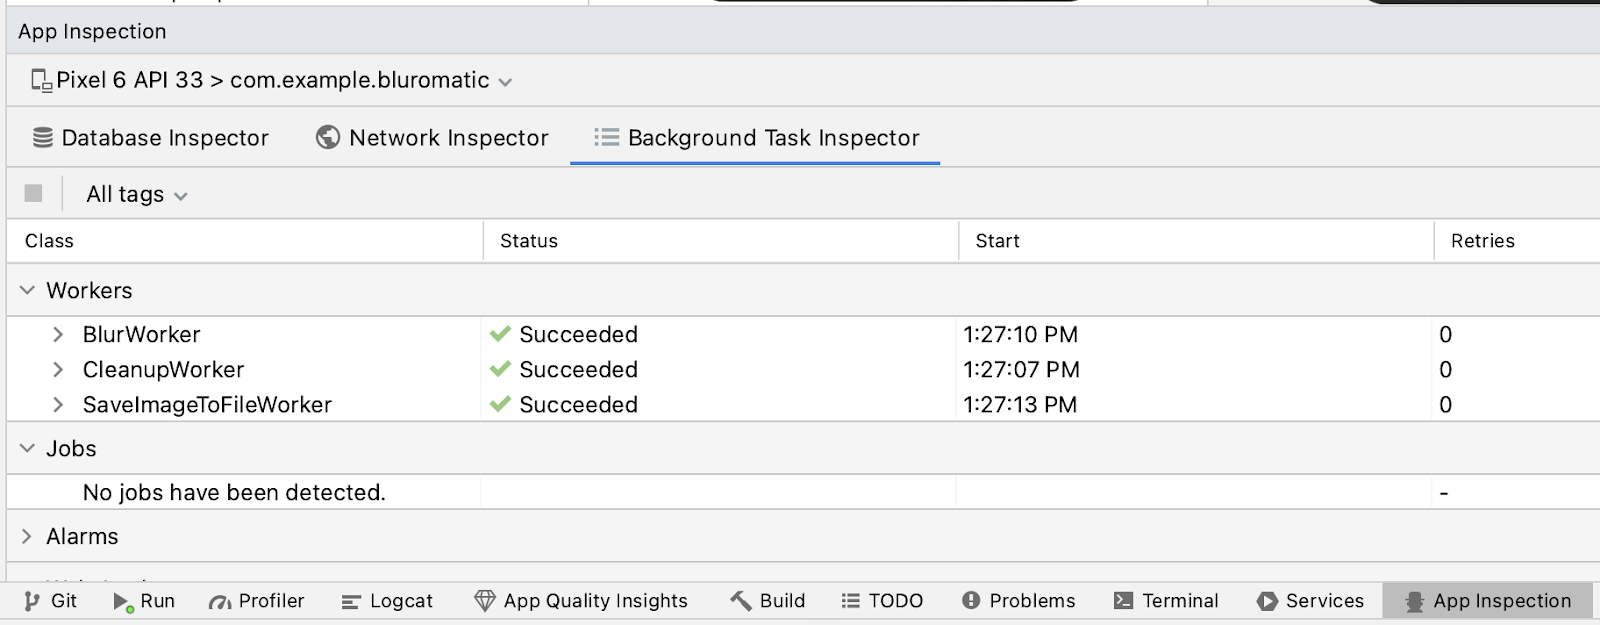
Run your app
- Run your app and click Start.
- Refer to the Background Task Inspector window to see how the various states correspond to the UI being displayed.
The SystemJobService is the component responsible for managing Worker executions.
While the workers are running, the UI shows the Cancel Work button and a circular progress indicator.


After the workers finish, the UI updates to show the Start button as expected.

5. Show final output
In this section, you configure the app to display a button labeled See File whenever there is a blurred image ready to show.
Create the See File button
The See File button only shows when the BlurUiState is Complete.
- Open the
ui/BluromaticScreen.ktfile and navigate toBlurActionscomposable. - To add space between the Start button and the See File button, add a
Spacercomposable within theBlurUiState.Completeblock. - Add a new
FilledTonalButtoncomposable. - For the
onClickparameter, passonSeeFileClick(blurUiState.outputUri). - Add a
Textcomposable for theButton's content parameter. - For the
Text'stextparameter, use the string resource idR.string.see_file.
ui/BluromaticScreen.kt
import androidx.compose.foundation.layout.Spacer
import androidx.compose.foundation.layout.width

// ...
is BlurUiState.Complete -> {
    Button(onStartClick) { Text(stringResource(R.string.start)) }
    // Add a spacer and the new button with a "See File" label
    Spacer(modifier = Modifier.width(dimensionResource(R.dimen.padding_small)))
    FilledTonalButton({ onSeeFileClick(blurUiState.outputUri) })
    { Text(stringResource(R.string.see_file)) }
}
// ...
Update the blurUiState
The BlurUiState state is set in the ViewModel and is dependent on the state of the work request and possibly the bluromaticRepository.outputWorkInfo variable.
- In the
ui/BlurViewModel.ktfile, inside themap()transform, create a new variableoutputImageUri. - Populate this new variable saved image's URI from the
outputDatadata object.
You can retrieve this string with the KEY_IMAGE_URI key.
ui/BlurViewModel.kt
import com.example.bluromatic.KEY_IMAGE_URI

// ...
.map { info ->
    val outputImageUri = info.outputData.getString(KEY_IMAGE_URI)
    when {
// ...
- If the worker finishes and the variable is populated, it indicates that a blurred image exists to display.
You can check if this variable is populated by calling outputImageUri.isNullOrEmpty().
- Update the
isFinishedbranch to also check that the variable is populated and then pass theoutputImageUrivariable into theBlurUiState.Completedata object.
ui/BlurViewModel.kt
// ...
.map { info ->
    val outputImageUri = info.outputData.getString(KEY_IMAGE_URI)
    when {
        info.state.isFinished && !outputImageUri.isNullOrEmpty() -> {
            BlurUiState.Complete(outputUri = outputImageUri)
        }
        info.state == WorkInfo.State.CANCELLED -> {
// ...
Create See File click event code
When a user clicks the See File button, its onClick handler calls its assigned function. This function passes as an argument in the call to the BlurActions() composable.
The purpose of this function is to display the saved image from its URI. It calls the showBlurredImage() helper function and passes in the URI. The helper function creates an intent and uses it to start a new activity to show the saved image.
- Open the
ui/BluromaticScreen.ktfile. - In the
BluromaticScreenContent()function, in the call to theBlurActions()composable function, start creating a lambda function for theonSeeFileClickparameter that takes a single parameter namedcurrentUri. This approach stores the saved image's URI.
ui/BluromaticScreen.kt
// ...
BlurActions(
    blurUiState = blurUiState,
    onStartClick = { applyBlur(selectedValue) },
    onSeeFileClick = { currentUri ->
    },
    onCancelClick = { cancelWork() },
    modifier = Modifier.fillMaxWidth()
)
// ...
- Inside the body of the lambda function, call the
showBlurredImage()helper function. - For the first parameter, pass the
contextvariable. - For the second parameter, pass the
currentUrivariable.
ui/BluromaticScreen.kt
// ...
BlurActions(
    blurUiState = blurUiState,
    onStartClick = { applyBlur(selectedValue) },
    // New lambda code runs when See File button is clicked
    onSeeFileClick = { currentUri ->
        showBlurredImage(context, currentUri)
    },
    onCancelClick = { cancelWork() },
    modifier = Modifier.fillMaxWidth()
)
// ...
Run your app
Run your app. You now see your new, clickable See File button, which takes you to the saved file:


6. Cancel work
Previously, you added the Cancel Work button, so now you can add the code to make it do something. With WorkManager, you can cancel work using the id, tag, and unique chain name.
In this case, you want to cancel work with its unique chain name because you want to cancel all work in the chain, not just a particular step.
Cancel the work by name
- Open the
data/WorkManagerBluromaticRepository.ktfile. - In the
cancelWork()function, call theworkManager.cancelUniqueWork()function. - Pass in the unique chain name
IMAGE_MANIPULATION_WORK_NAMEso the call only cancels scheduled work with that name.
data/WorkManagerBluromaticRepository.kt
override fun cancelWork() {
    workManager.cancelUniqueWork(IMAGE_MANIPULATION_WORK_NAME)
}
Following the design principle of separation of concerns, the composable functions must not directly interact with the repository. The composable functions interact with the ViewModel, and the ViewModel interacts with the repository.
This approach is a good design principle to follow because changes to your repository do not require you to change your composable functions as they do not directly interact.
- Open the
ui/BlurViewModel.ktfile. - Create a new function called
cancelWork()to cancel the work. - Inside the function, on the
bluromaticRepositoryobject, call thecancelWork()method.
ui/BlurViewModel.kt
/**
 * Call method from repository to cancel any ongoing WorkRequest
 * */
fun cancelWork() {
    bluromaticRepository.cancelWork()
}
Setup Cancel Work click event
- Open the
ui/BluromaticScreen.ktfile. - Navigate to the
BluromaticScreen()composable function.
ui/BluromaticScreen.kt
fun BluromaticScreen(blurViewModel: BlurViewModel = viewModel(factory = BlurViewModel.Factory)) {
    val uiState by blurViewModel.blurUiState.collectAsStateWithLifecycle()
    val layoutDirection = LocalLayoutDirection.current
    Surface(
        modifier = Modifier
            .fillMaxSize()
            .statusBarsPadding()
            .padding(
                start = WindowInsets.safeDrawing
                    .asPaddingValues()
                    .calculateStartPadding(layoutDirection),
                end = WindowInsets.safeDrawing
                    .asPaddingValues()
                    .calculateEndPadding(layoutDirection)
            )
    ) {
        BluromaticScreenContent(
            blurUiState = uiState,
            blurAmountOptions = blurViewModel.blurAmount,
            applyBlur = blurViewModel::applyBlur,
            cancelWork = {},
            modifier = Modifier
                .verticalScroll(rememberScrollState())
                .padding(dimensionResource(R.dimen.padding_medium))
        )
    }
}
Inside the call to the BluromaticScreenContent composable, you want the ViewModel's cancelWork() method to run when a user clicks the button.
- Assign the
cancelWorkparameter the valueblurViewModel::cancelWork.
ui/BluromaticScreen.kt
// ...
        BluromaticScreenContent(
            blurUiState = uiState,
            blurAmountOptions = blurViewModel.blurAmount,
            applyBlur = blurViewModel::applyBlur,
            cancelWork = blurViewModel::cancelWork,
            modifier = Modifier
                .verticalScroll(rememberScrollState())
                .padding(dimensionResource(R.dimen.padding_medium))
        )
// ...
Run your app and cancel work
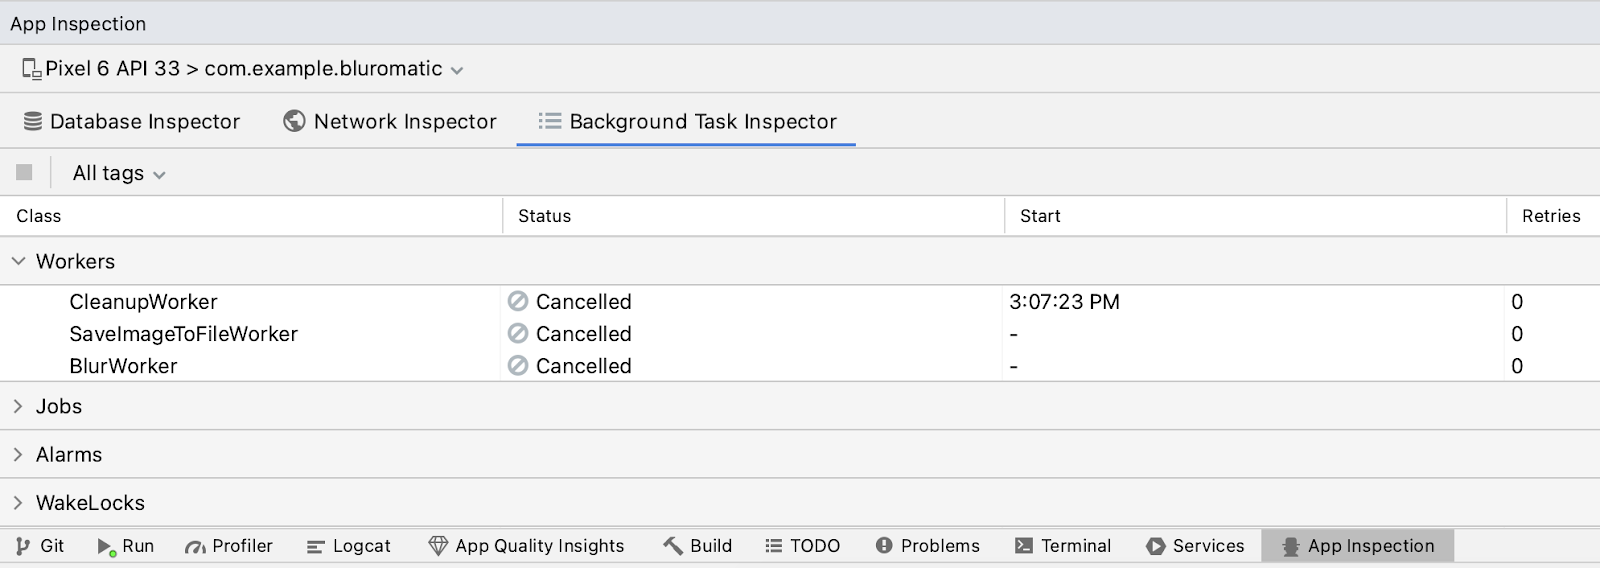
Run your app. It compiles just fine. Start blurring a picture and then click Cancel Work. The whole chain is cancelled!
After you cancel work, only the Start button shows because WorkInfo.State is CANCELLED. This change causes the blurUiState variable to be set to BlurUiState.Default, which resets the UI back to its initial state and shows just the Start button.
The Background Task Inspector shows the status of Cancelled which is expected.
7. Work constraints
Last but not least, WorkManager supports Constraints. A constraint is a requirement that you must meet before a WorkRequest runs.
Some example constraints are requiresDeviceIdle() and requiresStorageNotLow().
- For the
requiresDeviceIdle()constraint, if it is passed a value oftrue, the work runs only if the device is idle. - For the
requiresStorageNotLow()constraint, if it is passed a value oftrue, the work runs only if the storage is not low.
For Blur-O-Matic, you add the constraint that the device's battery charge level must not be low before it runs the blurWorker work request. This constraint means that your work request is deferred and only runs once the device's battery is not low.
Create the battery not low constraint
In the data/WorkManagerBluromaticRepository.kt file, complete the following steps:
- Navigate to the
applyBlur()method. - After the code declaring the
continuationvariable, create a new variable namedconstraints, which holds aConstraintsobject for the constraint being created. - Create a builder for a Constraints object by calling the
Constraints.Builder()function and assign it to the new variable.
data/WorkManagerBluromaticRepository.kt
import androidx.work.Constraints

// ...
    override fun applyBlur(blurLevel: Int) {
        // ...

        val constraints = Constraints.Builder()
// ...
- Chain the
setRequiresBatteryNotLow()method to the call and pass it a value oftrueso that theWorkRequestonly runs when the device's battery is not low.
data/WorkManagerBluromaticRepository.kt
// ...
    override fun applyBlur(blurLevel: Int) {
        // ...

        val constraints = Constraints.Builder()
            .setRequiresBatteryNotLow(true)
// ...
- Build the object by chaining a call to the
.build()method.
data/WorkManagerBluromaticRepository.kt
// ...
    override fun applyBlur(blurLevel: Int) {
        // ...

        val constraints = Constraints.Builder()
            .setRequiresBatteryNotLow(true)
            .build()
// ...
- To add the constraint object to the
blurBuilderwork request, chain a call to the.setConstraints()method and pass in the constraint object.
data/WorkManagerBluromaticRepository.kt
// ...
blurBuilder.setInputData(createInputDataForWorkRequest(blurLevel, imageUri))

blurBuilder.setConstraints(constraints) // Add this code
//...
Test with emulator
- On an emulator, change the Charge level in the Extended Controls window to be 15% or lower to simulate a low battery scenar