
1. Introduction
Last Updated: 2023-07-19
Why use Android Performance Tuner?
Android Performance Tuner helps you to measure and optimize your game's frame rate stability and graphical fidelity across many Android devices at scale, enabling you to deliver the best possible experience to each of your users. The Android Performance Tuner library, also known as Tuning Fork, records and aggregates live frame time information from your game, alongside your own game annotations and fidelity parameters, and uploads this data to the Play Console. This unlocks a new suite of metrics and insights in Android vitals.

What you'll build
In this codelab, you're going to open a demo game made for Unity, test it, and integrate Android Performance Tuner with it. After setting up and verifying that Android Performance Tuner works, we'll show how to upload the game to the Play Store and get access to the new performance insights provided by Android Performance Tuner in the Play Console.
What you'll learn
- How to add and set up Android Performance Tuner for your game.
- How to verify that Android Performance Tuner works properly and inspect the insights shown in the Play Console.
What you'll need
- Unity 2020 LTS installed on your computer.
- An Android device, connected to your computer, that has Developer options and USB debugging enabled. You will run the game on this device.
- A Google Developer account, and access to the Play Console to upload your game and to view Android vitals.
2. Opening Boat Attack with Unity
Get Boat Attack from GitHub
Follow these steps:
- Ensure you have git lfs installed.
- Clone the git repo using the command line (or your favorite git client):
git clone https://github.com/Unity-Technologies/BoatAttack.git - Check out the branch corresponding to your Unity version using the command line:
git checkout release/2020.3-LTS
Open Boat Attack with Unity 2020 LTS
Open the Unity Hub and choose Open > Add project from disk:
Choose the folder where you extracted the archive or cloned the Git repository.
The project will be added to the list of projects. Select an install of Unity 2020 LTS as the version of Unity to use with this project. This codelab was tested with Unity 2020 LTS. Other versions of Unity may require additional work not covered by this codelab.
Click the BoatAttack Unity editor version in the Editor Version column. Choose your installed version of Unity 2020 LTS and select Android as the platform. You can later switch to another platform, but Unity will have to re-import all of the assets, which can take some time.
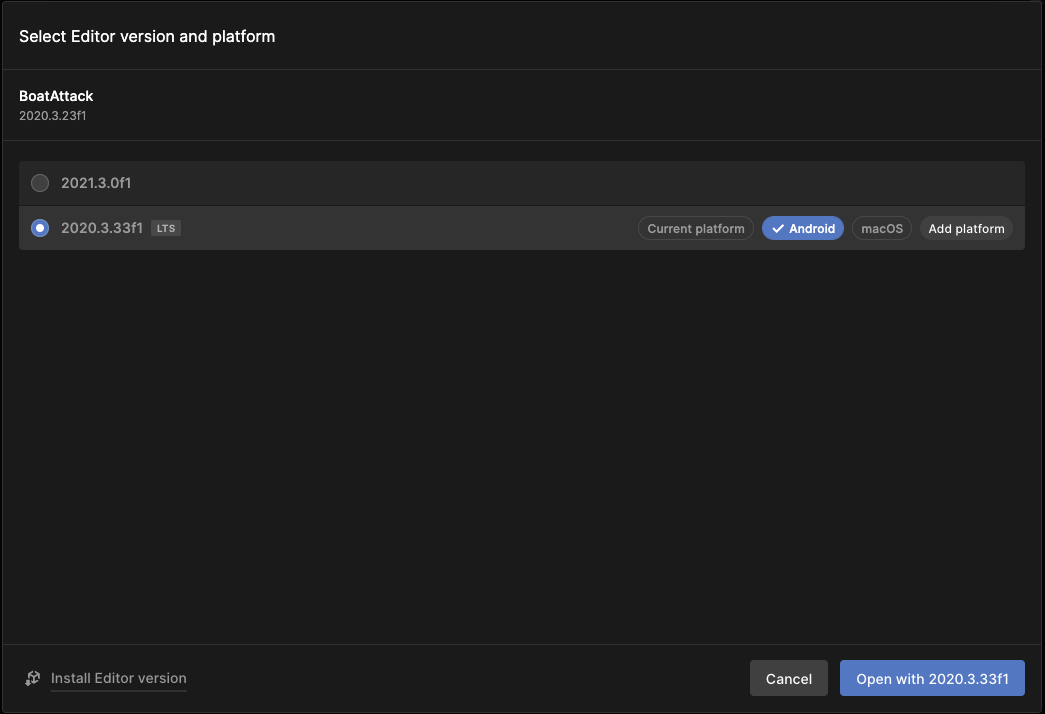
When you have the Android platform selected for the project, click on the project to open it. If you are asked to downgrade or upgrade the project, this means that your Unity version is different from the one that was used to create the project.
When Unity starts, you'll see the editor with a welcome window:

Close the Gameplay Ingredients tip window. In the Boat Attack welcome window, choose Open main_menu. You can then close this window too. If you don't see this window, click File > Open Scene and navigate to Assets > Scenes > main_menu.unity.
If you want to see the game in action, click the play button:

Click Race.

Click Spectator.

Click Race.
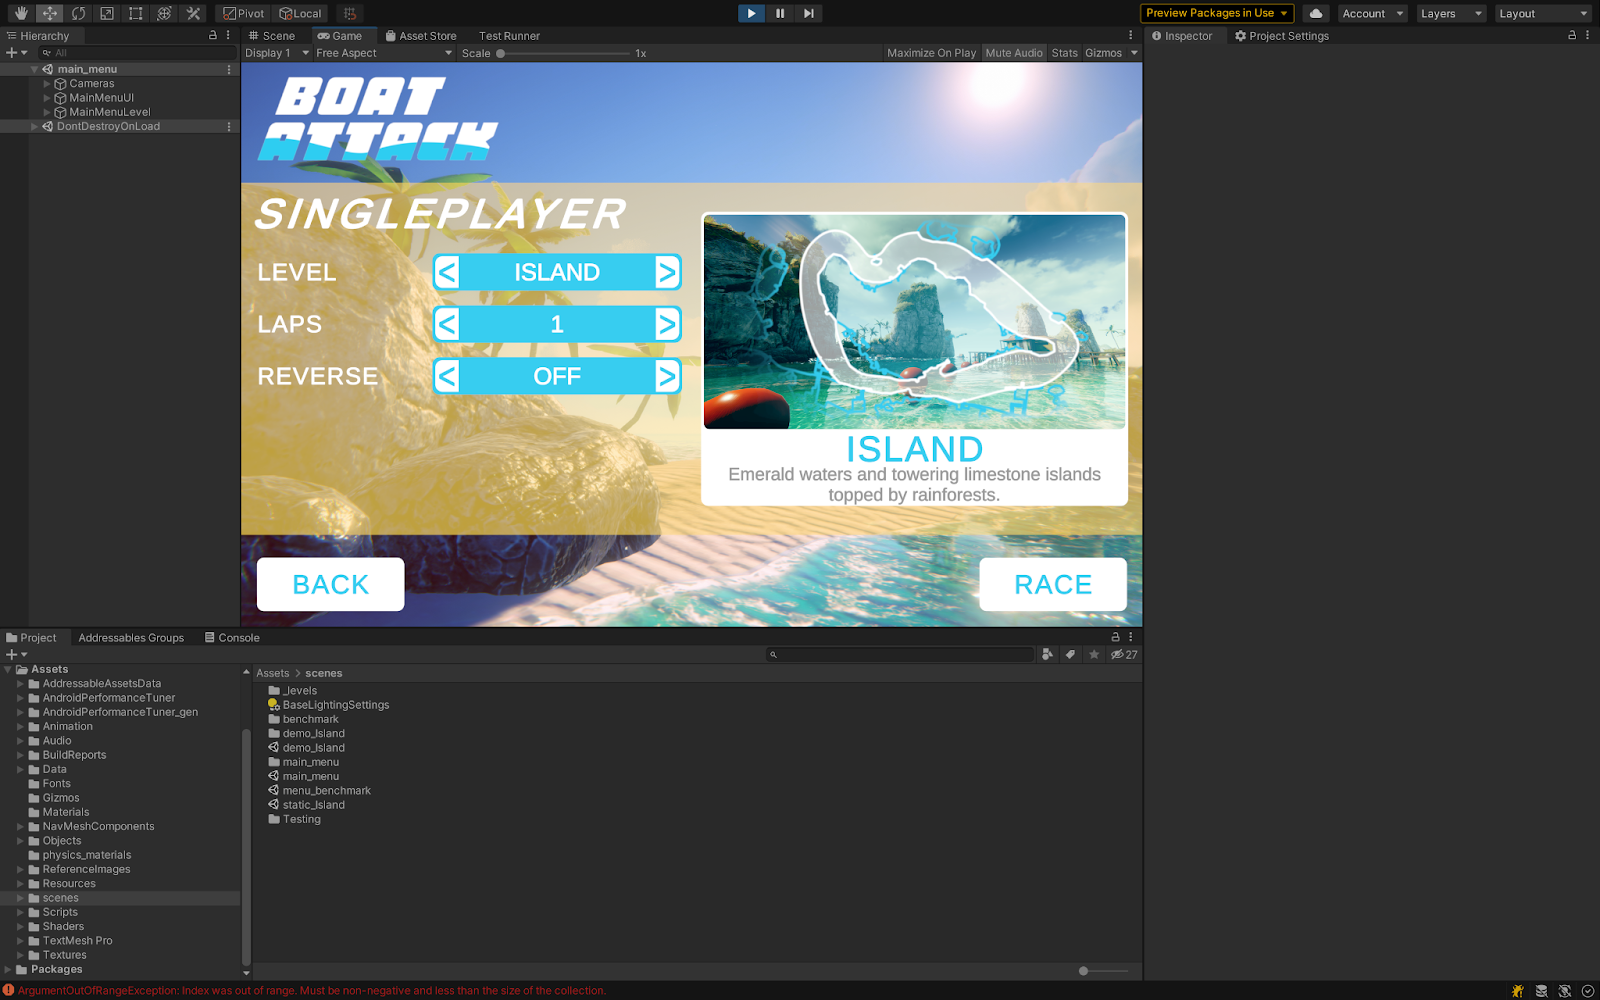
Wait for the game to load. The game will run in the editor. Because this is a demo, the boat is controlled by the AI.
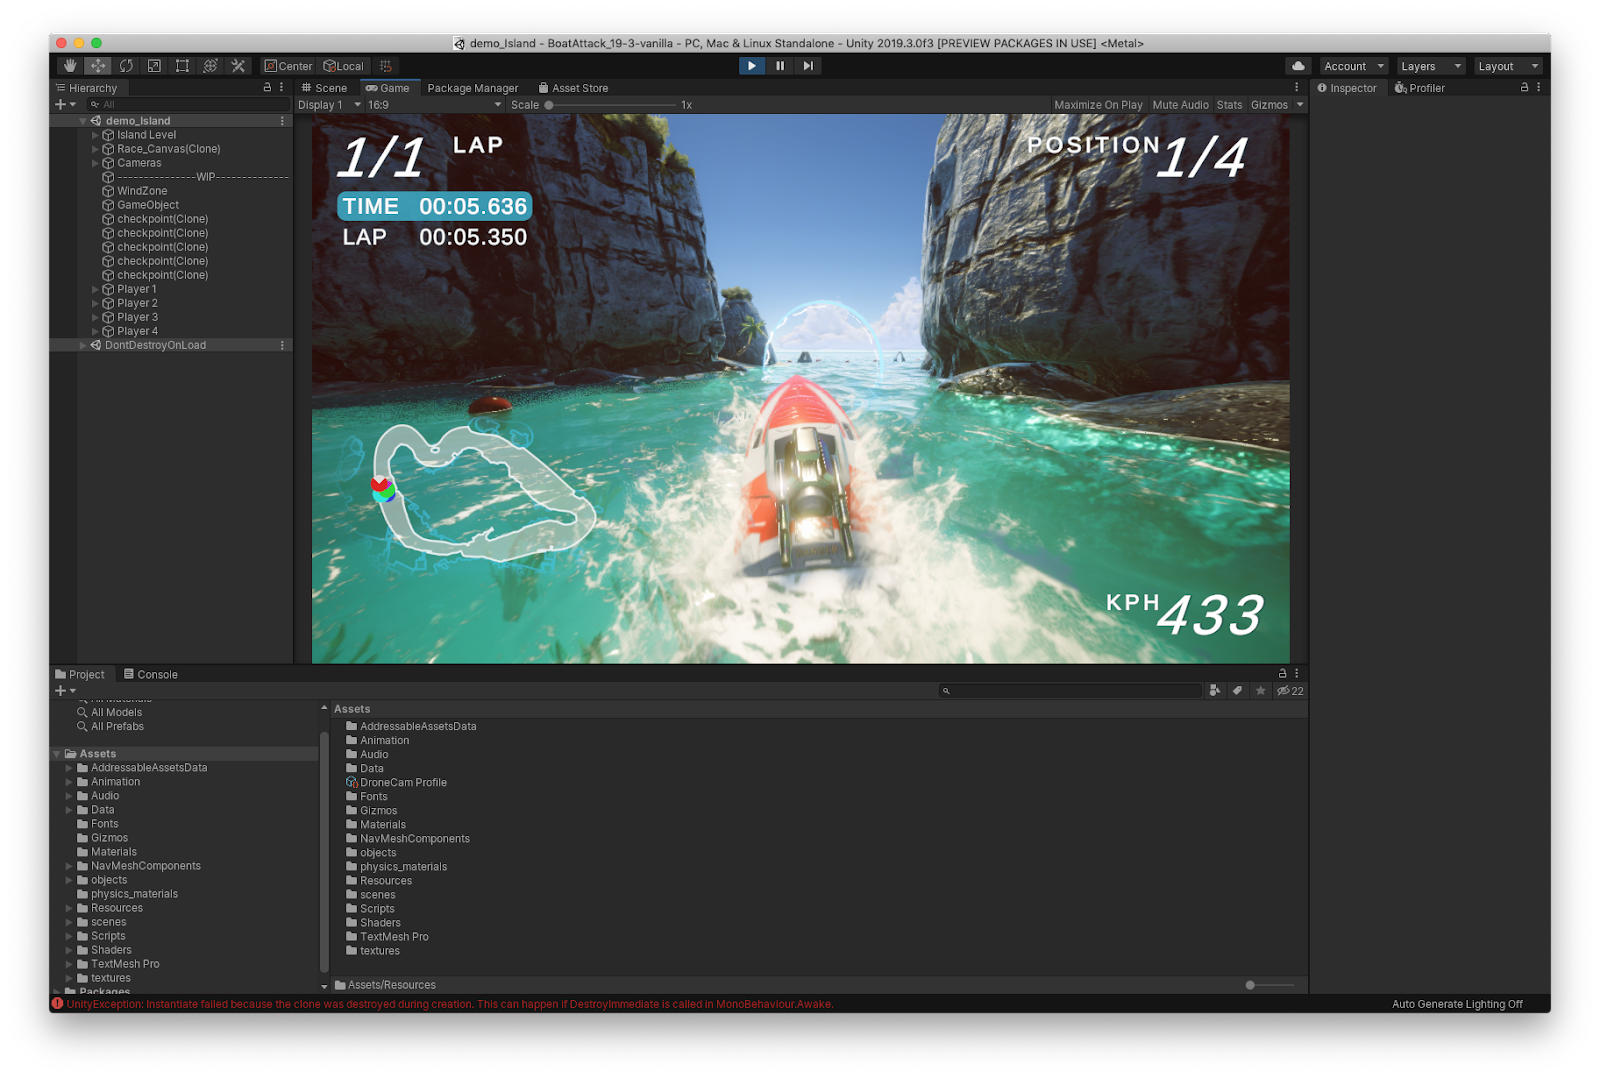
Now that you have the game open and running on your computer, let's try it on an Android device and then add Android Performance Tuner.
3. Try the game on a device
Before integrating Android Performance Tuner, it's a good idea to get familiar with the game and run it on an Android device.
Open the Build Settings
In the File menu, choose Build Settings. Under Platform, select Android. Then click Switch Platform.

Unity will re-import the assets for Android if it was not selected, which can take a bit of time.
Remove the demo scene from the build
To reduce the game size and the build time, we'll remove the demo_Island scene from the build. Clear the checkbox for the demo_island scene.

By default, the main_menu and level_Island scenes are included. Make sure the main_menu scene has a value of 0; otherwise, drag and drop it to the top of the list.
Ensure arm64 architecture is activated
To make sure the game is running at the highest speed on Android devices with 64-bit processors, make sure the game binaries are built with support for arm64. Open the Player Settings:

The settings are shown in a separate window. Under Settings for Android, click Other Settings:

Scroll down in the settings. Under Target Architectures, ensure the ARM64 and ARMv7 checkboxes are selected:

You can now close this window.
Build addressables
Before building the game, you need to build Unity addressables.
Open Window > Asset Management > Addressables > Groups.
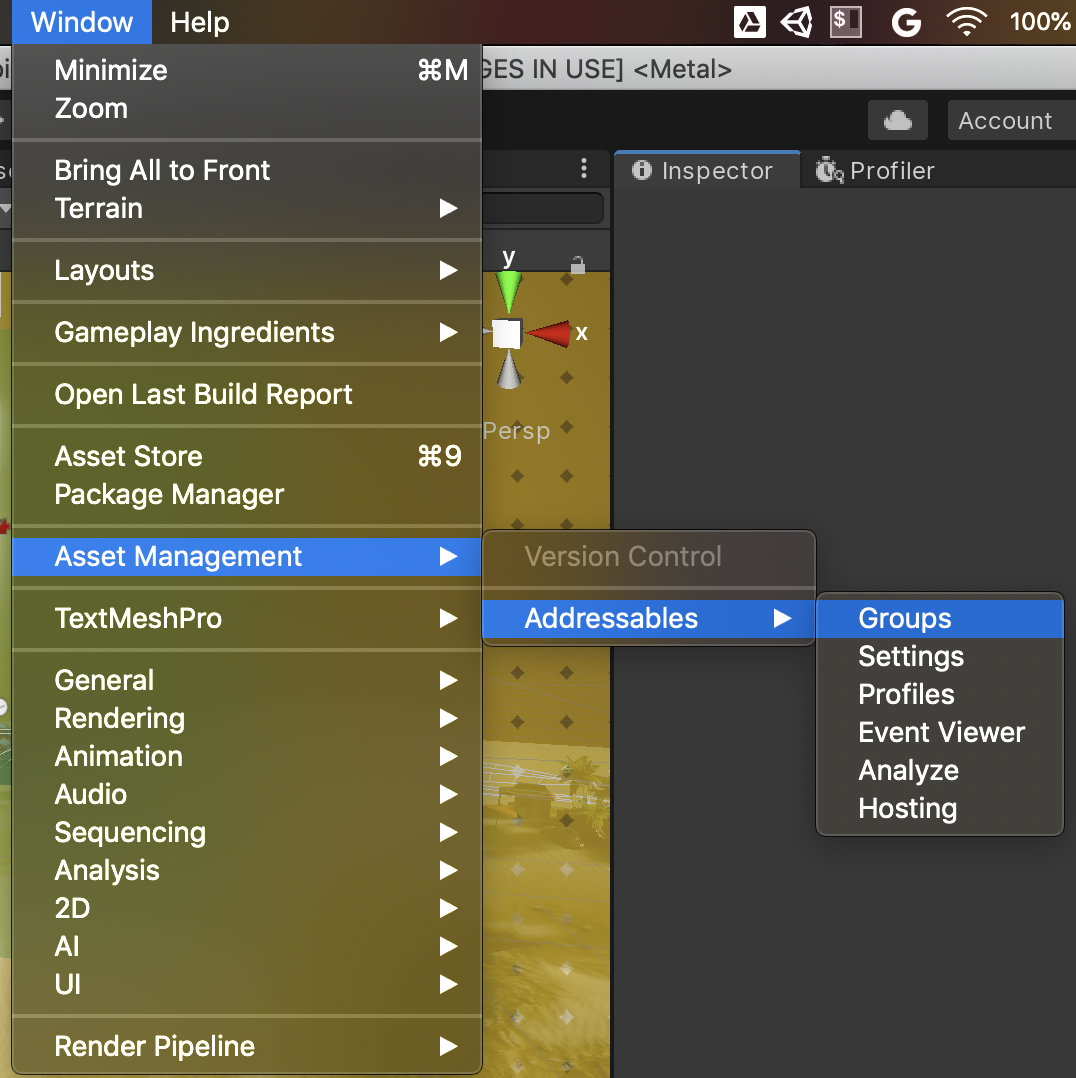
In the Addressables Groups window, choose Build > New Build > Default Build Script:
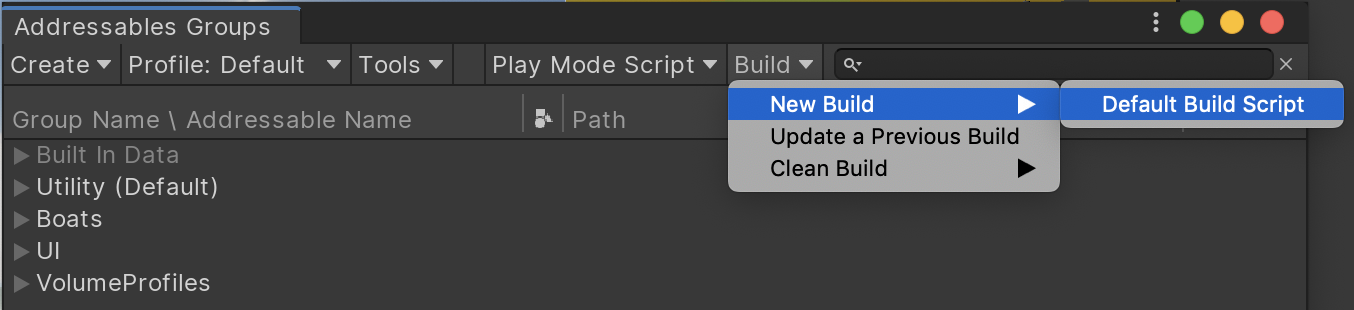
Wait for Unity to build the Addressables assets.
When it's done, you're ready to build and run the game on an Android phone.
Build and run the game
Connect your Android device to your computer and be sure to have the Build Settings window opened. Make sure your device has the developer options and USB Debugging enabled.
When connected, you can click the Refresh button *—*next to the Run Device dropdown menu— then click on the dropdown and find your device.

Once you've confirmed that your device is properly connected, you can keep the Default device option selected.
Click the Build And Run button. You'll be asked where to save the generated APK file on your computer. Choose a folder and enter a name like "BoatAttackDemo".
If the game doesn't build, go to Unity > Preferences > External Tools and check that all of the Android tools are installed and that no warning is shown:

Unity will now compile the game. This can again take a bit of time. At the end, the game will be installed on your device and started.
4. Get an API key for Android Performance Tuner
Enable "Android Performance Parameters API" on Google Cloud Platform
Before integrating Android Performance Tuner in your project, you need to get an API key for it. Android Performance Tuner will send performance data to the Google Play Console APIs, which must be able to identify your game.
- Create a new Cloud project in the Cloud Console:
- Enter a name for your Cloud project and click Create.
- Search for "Android Performance Parameters API" in the Marketplace.
- Enable the API.
Create an API key
The library is enabled, let's now create the API key:
- Go to API & Services, then Credentials from the menu.
- Click Create Credentials and choose API Key.
- From the API key created window, copy the value of the key and store it in a safe place.
- Click on Restrict Key.
- Enter a name for the key. Choose something that will remind you that it is linked to your game and Android Performance Tuner (for example, BoatAttack with Performance Tuner API key).

- Under API restrictions, choose Restrict key and select Android Performance Parameters API:
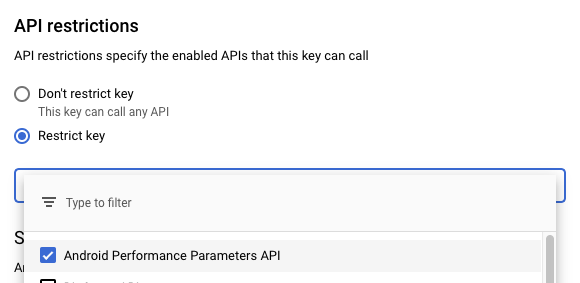
- Click Save to finish.
Now that you have the API key, copy it and keep it somewhere as you will need it to set up the Android Performance Tuner Unity plugin.
5. Add and set up the Android Performance Tuner
You will now install the Android Performance Tuner Unity plugin in the game.
Download and install the plugin
Download the Android Performance Tuner Unity plugin from GitHub and save it somewhere on your computer.
Choose the .unitypackage file for android-performance-tuner. Make sure the version number is 1.5.0 or higher. This file is a Unity Package that you can import in your project. In the Unity Assets menu, choose Import Package > Custom Package...

Choose the unitypackage file that you just downloaded. If asked which file to import, choose to import all the files.
Set the API key and explore the plugin configuration
When the Android Performance Tuner plugin is installed, you can open its configuration from the Window > Android Performance Tuner > Setup menu item.

The first tab shown in the window contains a field for the API Key. Paste your API key here:

The other tabs allow you to specify annotations and fidelity parameters.
- An annotation gives contextual information about what your game is doing when a frame is recorded (for example, the current level, whether a scene is loading, or any other state you think is relevant).
- A fidelity parameter is a parameter that can be modified to adjust the game quality. For example, this can be the level of detail of 3D models, texture resolution, the game rendering resolution, the number of particles on screen, etc.
In this codelab, you won't define any custom annotations or fidelity parameters. The Android Performance Tuner Unity plugin will record the current scene name as an annotation, and the active quality settings, defined in the Unity settings, as a fidelity parameter.
Enable Optimized Android Frame Pacing and VSync
Open the Player Settings (from the Build Settings window).
Under Settings for Android in the Resolution and Presentation section, make sure to enable Optimized Frame Pacing:

This will enable the Android Frame Pacing library for your game. Android Performance Tuner will use it to measure the performance of your game, including more in-depth measures compared to what Unity alone will report if you don't select this option.
From the Player Settings, select the Quality tab and find the VSync Count menu. Use any selection (except Don't Sync). This enables more precise measurements in conjunction with the Android Frame Pacing library.

Initialize Android Performance Tuner in your game
To enable Android Performance Tuner to instrument your game and send the gathered data to Play Console APIs, you need to initialize it. You will do that by creating a new script called GamePerformanceManager. You will use the existing AppSettings script to call GamePerformanceManager and initialize Android Performance Tuner when started.
- In the Project tab, navigate to Scripts > GameSystem.
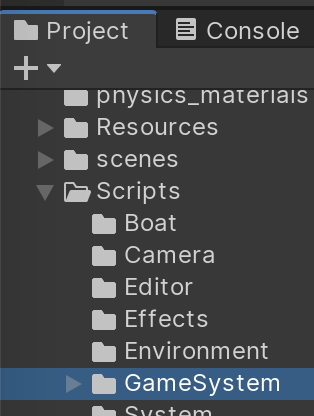
- Click the + button and choose C# Script.

- Enter
GamePerformanceManageras the script name:
- Double-click the
GamePerformanceManagerscript. Inside, instantiateAndroidPerformanceTunerand create anInitializemethod. This method initializes the library by calling itsStartmethod. Copy all of the following code into the new class
using Google.Android.PerformanceTuner;
using System.Collections;
using UnityEngine;

public class GamePerformanceManager
{
    AndroidPerformanceTuner<FidelityParams, Annotation> tuner =
        new AndroidPerformanceTuner<FidelityParams, Annotation>();

    public IEnumerator Initialize()
    {
        yield return new WaitForEndOfFrame(); // Needed to make sure Vulkan backend is fully ready, after the first frame.
        ErrorCode startErrorCode = tuner.Start();
        Debug.Log("Android Performance Tuner started with code: " + startErrorCode);

        tuner.onReceiveUploadLog += request =>
        {
            Debug.Log("Telemetry uploaded with request name: " + request.name);
        };
    }
}
- Open the AppSettings script. You will use it to instantiate the
GamePerformanceManagerand call itsInitializemethod. Add a privategamePerformanceManagerfield and add theStartmethod to call itsInitializemethod:
using System;
// ...

namespace BoatAttack
{
    [ManagerDefaultPrefab("AppManager")]
    public class AppSettings : Manager
    {
        // ...
        private GamePerformanceManager gamePerformanceManager = new GamePerformanceManager();

        // ...
        public IEnumerator Start()
        {
            yield return StartCoroutine(gamePerformanceManager.Initialize());
        }

        // ...
- This is enough to get Android Performance Tuner started and your game instrumented. We've added logs when Android Performance Tuner is started and when telemetry is uploaded to the Google Play Console APIs so that it's easier to verify that Android Performance Tuner works.
Reduce the interval between telemetry upload for testing
As we're still implementing the library in the project, it's a good idea to reduce the time between the uploads of the telemetry. By default, this time is set to a large interval so that the game is not making too many requests to the APIs, which is especially important for users that don't have a mobile data plan that includes unlimited data. This also avoids draining the battery.
In the case of this codelab, you can reduce this interval to make it easier to verify the proper uploading of the telemetry.
- Open the Android Performance Tuner settings by clicking Window > Android Performance Tuner > Setup in the menu.
- Choose Instrumentation Settings, then click Use advanced settings.
- Enter
0.5in the Intervals (minutes) field:
This will make Android Performance Tuner upload the telemetry every 30 seconds.
You now have Android Performance Tuner integrated, set up and initialized in your game. In the next section, we'll confirm proper integration by running the game on a device and checking the logs.
6. Verify the proper integration of Android Performance Tuner
Check that Android Performance Tuner starts properly
To confirm that Android Performance Tuner is properly integrated, connect your device to your computer and then build and run the game. In Unity, choose File > Build And Run. Be sure that Android is selected as the current platform; otherwise, switch to it in Build Settings.
While your game is launching on your phone, open a terminal on your computer and launch adb logcat:
adb logcat
Wait for the game to compile and run on your device.
In the output of adb logcat, search for TuningFork (Tuning Fork is the internal name of the Android library):
02-03 16:55:45.103 10511 10536 I TuningFork: Got settings from tuningfork/tuningfork_settings.bin
02-03 16:55:45.103 10511 10536 I TuningFork: Using local file cache at /data/user/0/com.Unity3d.BoatAttackDay/cache/tuningfork
02-03 16:55:45.105 10511 10536 I TuningFork: OpenGL version 3.2
02-03 16:55:45.105 10511 10536 I TuningFork: TuningFork.GoogleEndpoint: OK
02-03 16:55:45.106 10511 10611 I TuningFork: Creating directory /data/user/0/com.Unity3d.BoatAttackDay/cache/tuningfork
02-03 16:55:45.106 10511 10536 I TuningFork: TuningFork Settings:

[...]

02-03 16:55:45.107 10511 10536 I TuningFork: TuningFork initialized
02-03 16:55:45.107 10511 10536 I UnityTuningfork: Swappy backend: 1
02-03 16:55:45.107 10511 10536 I TuningFork: Creating directory /data/user/0/com.Unity3d.BoatAttackDay/cache/tuningfork/V1
02-03 16:55:45.110 10511 10613 I TuningFork: OpenGL version 3.2
02-03 16:55:45.110 10511 10613 I TuningFork:Web: Connecting to: https://performanceparameters.googleapis.com/v1/applications/com.Unity3d.BoatAttackDay/apks/1:generateTuningParameters
If you made a mistake while setting up Android Performance Tuner, like forgetting to set the API key, you should see an error in the initialization logs. For example:
02-03 16:49:44.970  8815  8831 I TuningFork: Got settings from tuningfork/tuningfork_settings.bin
02-03 16:49:44.971  8815  8831 I TuningFork: Using local file cache at /data/user/0/com.Unity3d.BoatAttackDay/cache/tuningfork
02-03 16:49:44.972  8815  8831 I TuningFork: OpenGL version 3.2
02-03 16:49:44.972  8815  8831 W TuningFork.GE: The API key in Tuning Fork TFSettings is invalid
02-03 16:49:44.972  8815  8831 E TuningFork: TuningFork.GoogleEndpoint: FAILED
02-03 16:49:44.973  8815  8831 I Unity   : Tuningfork started with code: BadParameter
Check that Android Performance Tuner is uploading telemetry
If you see TuningFork initialized in the logs, wait a bit more and look for logs indicating that telemetry is being uploaded:
02-03 16:58:00.552 10511 10611 I TuningFork:Web: Connecting to: https://performanceparameters.googleapis.com/v1/applications/com.Unity3d.BoatAttackDay/apks/1:uploadTelemetry
02-03 16:58:00.898 10511 10611 I TuningFork:Web: Response code: 200
02-03 16:58:00.898 10511 10611 I TuningFork:Web: Response message: OK
02-03 16:58:00.899 10511 10611 I TuningFork.GE: UPLOAD request returned 200 {}
Search in the logs for Connecting to, followed by the response code a few lines after.
Now that we've confirmed that Android Performance Tuner is running and can properly upload the data from the game, we'll add an in-game annotation to tell the Android Performance Tuner when the game is loading. This will avoid recording performance at this moment - which is expected to be poor. We'll then build and upload the game to the Play Store, distribute it to testers and verify that insights are shown in the Vitals section of the Play Console.
7. Add loading time recording functions
It's important to record when your game is performing loading events for two reasons:
- To avoid polluting your frame time data while loading.
- To analyze load times to see when and where load times are longer than acceptable.
A loading event can have an associated annotation (defined in the same way as frame time annotations) and metadata. As a single loading period seen by the user may contain several loading events, all loading events must be part of a loading group. Only one loading group can be active at a time. Loading groups and events are identified by handles that are used by the Stop functions to end the recordings.
- Create a new public method in
GamePerformanceManager, calledStartRecordingLoadingGroup:
public class GamePerformanceManager
{
    // ...

    public ulong StartRecordingLoadingGroup()
    {
        LoadingTimeMetadata groupMetadata = new LoadingTimeMetadata()
        {
            state = LoadingTimeMetadata.LoadingState.InterLevel,
            source = LoadingTimeMetadata.LoadingSource.UnknownSource
        };
        // The metadata and annotation are currently not used by the
        // Play backend but only the annotation can be set to null.
        Result<ulong> result = tuner.StartLoadingGroup(groupMetadata, null);
        return result.value;
    }
- Create a new public method in
GamePerformanceManager, calledStartRecordingLoadingEvent:
public class GamePerformanceManager
{
    // ...

    public ulong StartRecordingLoadingEvent(int sceneIndex)
    {
        LoadingTimeMetadata sceneLoadingMetadata = new LoadingTimeMetadata()
        {
            // Any fields that aren't relevant to your needs can be zero.
            state = LoadingTimeMetadata.LoadingState.InterLevel,
            source = LoadingTimeMetadata.LoadingSource.UnknownSource,
            compression_level = 0,
            network_connectivity = 0,
            network_transfer_speed_bps = 0,
            network_latency_ns = 0
        };
        Annotation annotation = new Annotation() {Scene = (Scene) (sceneIndex + 1)};
        // Start recording loading time.
        Result<ulong> result = tuner.StartRecordingLoadingTime(sceneLoadingMetadata, annotation);
        return result.value;
    }
- Create a new public method in
GamePerformanceManager, calledStopRecordingLoadingEvent:
public class GamePerformanceManager
{
    // ...

    public void StopRecordingLoadingEvent(ulong handle)
    {
        tuner.StopRecordingLoadingTime(handle);
    }
The recorded event is uploaded at the next session flush.
- Create a new public method in
GamePerformanceManager, calledStopRecordingLoadingGroup:
public class GamePerformanceManager
{
    // ...

    public void StopRecordingLoadingGroup(ulong handle)
    {
        tuner.StopLoadingGroup(handle);
    }
- Open the
AppSettingsscript, where you previously added theGamePerformanceManagerfield and called itsInitializemethod. - Add two
ulongvariables that will store the handles of the loading group and loading event.
using System;
// ...

namespace BoatAttack
{
    [ManagerDefaultPrefab("AppManager")]
    public class AppSettings : Manager
    {
        // ...
        public ulong groupHandle;
        public ulong eventHandle;
- Find the
LoadScene(int buildIndex, LoadSceneMode mode)method and add calls toStartRecordingLoadingGroupandStartRecordingLoadingEvent. Save their results in the corresponding handles. Then, find theCleanupLoadingScreenmethod and add calls toStopRecordingLoadingEventandStopRecordingLoadingGrouppassing the stored handles:
using System;
// ...

namespace BoatAttack
{
    [ManagerDefaultPrefab("AppManager")]
    public class AppSettings : Manager
    {
        // ...
        public static void LoadScene(int buildIndex, LoadSceneMode mode)
        {
            Instance.groupHandle = Instance.gamePerformanceManager.StartRecordingLoadingGroup();
            Instance.eventHandle = Instance.gamePerformanceManager.StartRecordingLoadingEvent(buildIndex);
            // ...
        }

        // ...

        private void CleanupLoadingScreen()
        {
            Instance.